
Table of Contents
Section 1: Introduction & The Evolution of the Frontliner
In any tabletop gaming community, you will eventually encounter the classic “Martial vs. Caster” disparity debate. The conventional wisdom is that spellcasters slowly warp the fabric of reality while martial classes merely hit things with a piece of metal. But is that entirely true? When you dive into high-level play, the math tells a very different story. Through precise 5e martial optimisation, a dedicated melee character can deliver devastating, reliable single-target damage round after round—often out-damaging spellcasters who burn through their highest-level resource slots just to keep up.
To understand why 5e martial optimisation works so well today, it is helpful to look back at how we got here.
A 30-Year Perspective: From THAC0 to Advantage
Having sat at the gaming table for over 30 years, I have watched the evolution of the frontliner firsthand. Back in the days of Advanced Dungeons & Dragons (AD&D), playing a warrior was straightforward but mechanically restrictive. Your effectiveness was largely dictated by your THAC0 (To Hit Armour Class 0) progression and how many points you put into weapon specialisation. There were no complex tactical manoeuvres or feat synergies. You stood in the doorway, took the hits, and rolled your dice.
When the game transitioned into 3rd and 3.5 Edition, everything changed. Suddenly, character creation became a deep strategy game in its own right. We were introduced to massive feat trees like Power Attack, Cleave, and Leap Attack. These mechanics allowed players to trade accuracy for overwhelming damage, completely reshaping how melee characters contributed to the party.
To understand why 5e martial optimisation works so well today, it is helpful to look back at how we got here through the lens of core tabletop gaming fundamentals developed over decades of play.
Now, in the modern landscape of the world’s most popular role-playing game, the math has shifted once again. 5e has traded the dense numeric modifiers of older editions for a streamlined, elegant core engine driven by the official 5e Basic Rules on Advantage and Disadvantage. However, the fundamental goal of top-tier 5e martial optimisation remains the same as it was decades ago: maximising your action economy, bending the math in your favour, and guaranteeing that every attack you make hits hard.
The Reality of the Frontline in 5e
The secret to mastering 5e martial optimisation lies in understanding that your primary resource isn’t spell slots or long-rest abilities—it is your action economy.
While casters are often limited to casting one major spell per turn, a highly optimised melee build turns the action economy on its head. By combining the right weapon choices, fighting styles, and combat feats, a martial character can consistently weaponise their Action, Bonus Action, and Reaction in a single round.
This guide is designed to strip away the guesswork and provide you with a concrete roadmap for scaling your damage from Level 1 all the way to Level 20. Whether you are aiming to build an unstoppable great-weapon brawler or a high-reach battlefield controller, understanding how these mechanics interact will turn your character into the absolute anchor of your adventuring party.
Section 2: Weapon Choices and Fighting Styles
Before you can build a high-performing character, you have to understand the tools of the trade. The bedrock of successful 5e martial optimisation begins with two core choices you make early in character generation: your weapon type and your fighting style.
Every single choice you make here directly influences your math, your damage scaling, and how you interact with the battlefield grid. Let us break down these foundations systematically to see how a slight shift in die type changes your combat efficiency over a long campaign.
The Weapon Spectrum: Heavy, Reach, and One-Handed
Choosing a weapon isn’t just a matter of flavour; it is a tactical decision that sets your baseline damage. When evaluating weapons for 5e martial optimisation, we analyse them through the lens of average damage output, action economy, and opportunity costs.
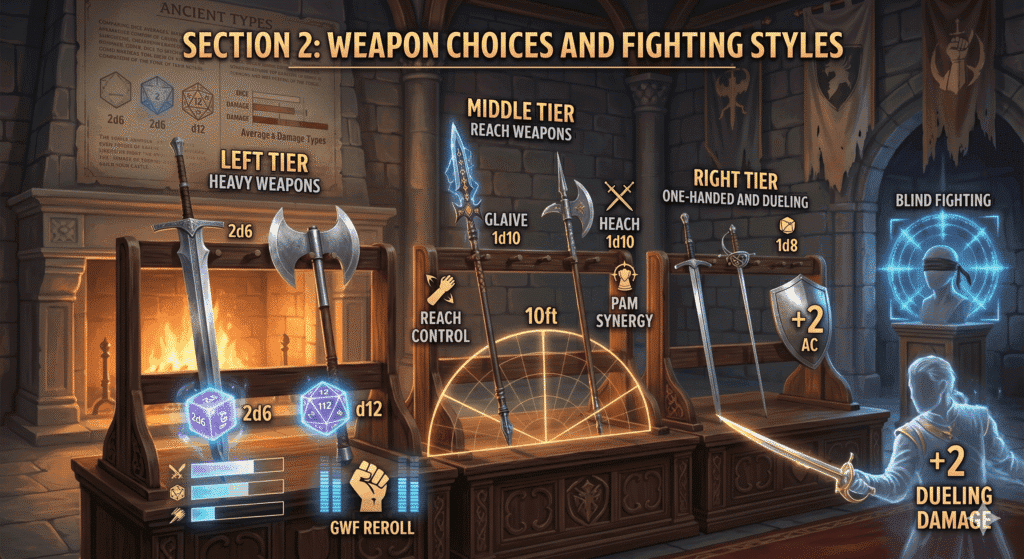
1. Heavy Weapons: Greatsword vs. Greataxe
The classic debate between two-handed powerhouses usually comes down to the Greatsword (2d6) versus the Greataxe (1d12). From an optimisation standpoint, they are not equal.
- The Greatsword (2d6): A greatsword offers incredibly consistent damage. The average roll of 1d6 is 3.5, meaning a greatsword averages 7 damage per hit before adding any ability modifiers. Because you are rolling two dice, your damage curve forms a bell curve. You can verify the baseline damage and properties of these heavy options using the standard 5e weapons table.
- The Greataxe (1d12): A greataxe has a completely flat damage distribution. You have an equal 8.33% chance to roll a 12 as you do to roll a 1. Its average damage is 6.5, which is mathematically inferior to the greatsword.
When does the Greataxe win? The greataxe only becomes mechanically superior when combined with specific high-tier features like the Half-Orc’s Savage Attacks or the Barbarian’s Brutal Critical. These features allow you to add one extra weapon die on a critical hit. Adding an extra 1d12 (average 6.5) yields significantly more burst damage than adding an extra 1d6 (average 3.5).
2. Reach Weapons: The Glaive and Halberd
For advanced tactical players, Reach weapons like the Glaive and Halberd are the undisputed champions of 5e martial optimisation.
Both weapons deal 1d10 slashing damage, yielding an average of 5.5 damage per strike. While you sacrifice exactly 1.5 average damage compared to a greatsword, you gain a massive mechanical advantage: a 10-foot reach.
- Action Economy and Control: Having a 10-foot reach means you threaten a much larger area of the battlefield. It allows you to strike enemies and step away without provoking opportunity attacks, functioning as a pseudo-disengage.
- Feat Compatibility: The real power of the glaive and halberd unlocks when paired with feats like Polearm Master and Sentinel, which we will explore in the next section. These allow you to attack enemies as they enter your reach, completely shutting down their movement before they can even get close enough to strike you.
3. One-Handed Weapons: The Longsword, Battleaxe, and Rapier
One-handed weapons are designed for players who prefer to balance offence with defence. When optimising around a one-handed weapon, you are typically trading high damage dice for the +2 Armour Class (AC) granted by a shield.
- Versatile Weapons (1d8 or 1d10): Weapons like the longsword or battleaxe deal 1d8 (average 4.5) when held in one hand.
- Finesse Weapons (1d8): The rapier is the ultimate choice for Dexterity-based builds. It matches the 1d8 damage of versatile weapons while letting you focus entirely on a stat that boosts your AC, initiative, and key saving throws.
Fighting Style Synergies: Turning Math into Damage
Your Fighting Style is a permanent passive buff that shapes your combat behaviour. When your goal is optimal damage scaling, certain styles provide a much higher return on investment than others.
Great Weapon Fighting (GWF)
This style allows you to reroll a 1 or 2 on any damage die when using a two-handed melee weapon. While it sounds incredibly powerful, the math is subtle:
- On a greatsword (2d6), you have two dice that can trigger a reroll. Rerolling 1s and 2s raises the average damage of each die from 3.5 to 4.16, boosting the overall average of your greatsword from 7 to 8.33.
- On a greataxe (1d12), the impact is far lower. Rerolling 1s and 2s only increases the average damage from 6.5 to 7.33.
For true 5e martial optimisation, if you pick the GWF style, pair it exclusively with a greatsword or maul to get the most out of the reroll mechanics.
Dueling
The Duelling fighting style grants a flat +2 damage bonus on all attacks when you are wielding a melee weapon in one hand and no other weapons.
Do not underestimate this style. A longsword held in one hand with the Duelling style deals 1d8 + 2 damage, averaging 6.5 damage per hit. That is the same average damage as a greataxe held in two hands, but you still have a hand free to hold a shield for a massive boost to your survivability. This makes Duelling highly competitive for players who want a balanced, high-efficiency build.
Blind Fighting
Introduced as a brilliant utility option, Blind Fighting grants you Blindsight out to a range of 10 feet. It allows you to effectively see anything within that radius, even if you are heavily obscured, blinded, or fighting invisible enemies.
In terms of pure 5e martial optimisation, this is an incredible combat multiplier. If your party spellcaster drops a spell like Fog Cloud or Darkness, your opponents suffer Disadvantage on their attacks because they cannot see. You, however, operate with perfect vision within 10 feet. This grants you permanent Advantage on your attacks against them, turning a chaotic battlefield effect into a massive personal damage engine.
Section 3: The Synergy Engine: Top Feats for Melee Mastery
In the realm of 5e martial optimisation, Ability Score Improvements (ASIs) are often a trap. While increasing your primary attacking stat to 18 or 20 gives you a reliable +1 to hit and damage, it offers little in terms of dynamic tactical gameplay. Feats, on the other hand, are the true force multipliers of the 5e engine.
To achieve world-class damage scaling that keeps up with high-level spellcasters, you must build what is known as a synergy engine—a combination of specific combat feats that build upon each other to weaponise your entire action economy.
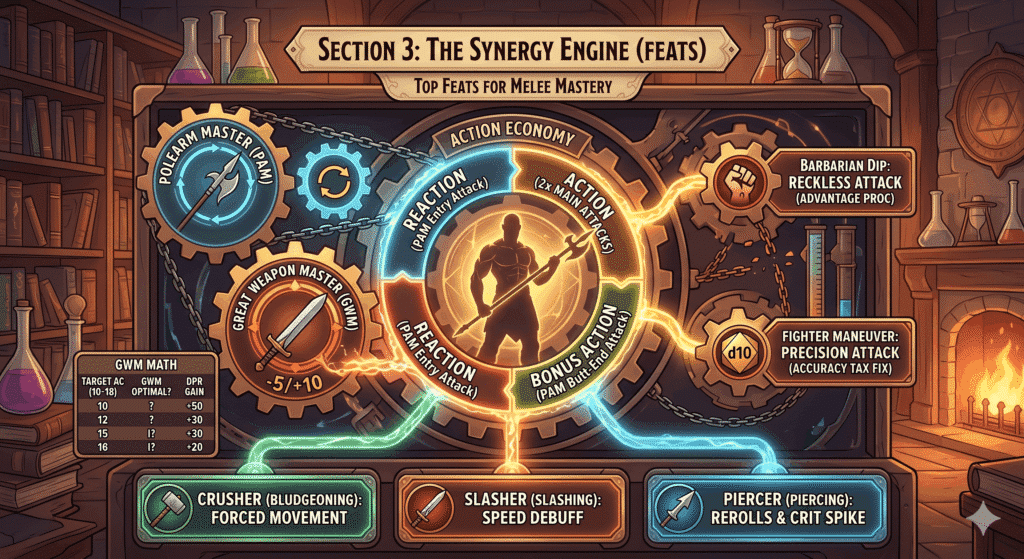
The S-Tier Damage Enhancers: Great Weapon Master + Polearm Master
If you look across the top tier of competitive melee builds, two feats consistently dominate the conversation: Great Weapon Master (GWM) and Polearm Master (PAM). Individually, each feat is excellent. Combined, they create the most devastating melee combo in the game.
1. Polearm Master (PAM)
This feat fundamentally alters your action economy by giving you two reliable ways to make attacks outside of your standard Attack action:
- The Bonus Action Attack: When you take the Attack action with a glaive, halberd, pike, quarterstaff, or spear, you can use a bonus action to make a melee attack with the opposite end of the weapon. This attack deals 1d4 bludgeoning damage plus your Strength modifier.
- The Reaction Attack: While most characters only get to make an opportunity attack when an enemy leaves their reach, PAM allows you to make an attack the moment an enemy enters your reach.
For a martial character, turning your bonus action and reaction into guaranteed attacks means your damage floor rises significantly before you even consider adding extra modifiers.
2. Great Weapon Master (GWM)
This is the ultimate high-risk, high-reward feat for heavy weapon builds. It provides two distinct benefits:
- On a critical hit or when you reduce a creature to 0 hit points, you can make one melee weapon attack as a bonus action.
- Before you make a melee attack with a heavy weapon you are proficient with, you can choose to take a -5 penalty to your attack roll. If the attack hits, you add +10 to the damage.
Standard Attack Round with PAM + GWM:
Action: 2 Attacks (Extra Attack)
Bonus Action: 1 Attack (PAM butt-end or GWM crit/kill proc)
Total: 3 distinct chances to apply the +10 GWM damage bonus!
The -5 / +10 Math: When to Turn GWM On
To make the most of 5e martial optimisation, you should not blindly use the GWM penalty on every strike. Doing so against an enemy with high Armour Class (AC) can actually decrease your average damage per round because your chance to hit drops too low.
Below is an exact breakdown of how the -5 penalty alters your damage output based on the target’s AC. For this example, assume a Level 5 character with a Strength of 16 (+3 modifier), a +3 Proficiency Bonus, and a glaive (1d10 damage, average 5.5). This yields a standard attack modifier of +6 and a baseline average damage of 8.5 per hit (5.5 + 3 \text{ Strength}).
| Target AC | Baseline Hit Chance | Hit Chance with GWM | Average Damage per Strike (No GWM) | Average Damage per Strike (With GWM) | Is GWM Optimal? |
| 10 (Very Low) | 85% | 60% | 7.23 | 11.10 | Yes |
| 13 (Low) | 70% | 45% | 5.95 | 8.33 | Yes |
| 15 (Mid) | 60% | 35% | 5.10 | 6.48 | Yes |
| 18 (High) | 45% | 20% | 3.83 | 3.70 | No |
| 20 (Very High) | 35% | 10% | 2.98 | 1.85 | No |
The takeaway here is highly consistent. Against typical enemies with an AC of 17 or lower, the flat +10 damage bonus always outweighs the loss of accuracy. However, once you face boss monsters with an AC of 18 or higher, the baseline math flips. At this point, you must either turn off GWM or find a mechanical way to generate Advantage on your attack rolls. To see how these variables shift with your specific statistics, you can test your exact level splits using a 5e Damage Per Round (DPR) calculator.
The Damage Type Half-Feats: Crusher, Slasher, and Piercer
While the PAM/GWM combination sets your damage ceiling, “half-feats” (feats that grant a +1 to an ability score alongside a special feature) allow you to customise your battlefield utility. These feats are tied directly to the damage type of your chosen weapon, rewarding focused build paths.
1. Crusher (Bludgeoning)
If you prefer wielding a maul or the blunt end of a polearm, Crusher is an incredible control option.
- The Push: Once per turn, when you hit a creature with bludgeoning damage, you can move it 5 feet to an unoccupied space.
- The Advantage Proc: When you score a critical hit with bludgeoning damage, all attacks made against that creature have Advantage until the start of your next turn.
Tactical Tip: You can use the Crusher push to knock a target 5 feet away from you without triggering an opportunity attack. This leaves them exactly 10 feet away. To close the distance on their next turn, the enemy must re-enter your threatened space, triggering your Polearm Master reaction attack instantly.
2. Slasher (Slashing)
Ideal for greatsword, greataxe, and glaive users, Slasher focuses on slowing down your targets.
- The Slow: Once per turn, when you hit a creature with slashing damage, you reduce its speed by 10 feet until the start of your next turn.
- The Disadvantage Proc: When you score a critical hit, the creature has Disadvantage on all attack rolls until the start of your next turn.
This speed reduction allows you to outpace enemies on the grid, keeping them from reaching fragile backline allies like wizards or sorcerers.
3. Piercer (Piercing)
Perfect for pike, rapier, or lance users, Piercer maximises your crit damage and die consistency.
- The Reroll: Once per turn, you can reroll one damage die that rolled a 1 or 2.
- The Crit Spike: When you score a critical hit, you roll one additional damage die.
Resolving the Accuracy Tax
The final piece of elite 5e martial optimisation is learning how to overcome the -5 penalty of Great Weapon Master. You cannot afford to miss half of your attacks. To fix your accuracy, you need features that either grant Advantage on demand or add flat bonuses to your attack rolls.
How to Counter the GWM Accuracy Tax:
Option A: Generate Advantage (e.g., Barbarian’s Reckless Attack)
Option B: Flat Bonus Die (e.g., Fighter’s Precision Attack)
Option C: Magical Buffs (e.g., Bless spell or +1/+2 weapons)
The Barbarian Route: Reckless Attack
A direct path to high accuracy is taking a 2-level dip into Barbarian for Reckless Attack. This feature allows you to gain Advantage on all melee weapon attack rolls using Strength during your turn.
Mathematically, having an advantage is equivalent to a +3 to +5 bonus on your attack roll, depending on the target’s AC. This completely neutralises the -5 penalty from GWM. The trade-off is that enemies also gain Advantage on attack rolls against you until your next turn, but as a heavily armoured martial character with high HP, your job is to draw fire anyway.
- The Fighter Route: Precision Attack: If you prefer a pure Fighter build or want to avoid multiclassing, selecting the Battle Master subclass gives you access to the Precision Attack manoeuvre. This allows you to convert near-misses into massive hits without wasting your resources. For a complete breakdown of manoeuvres, see our focused Battle Master Fighter strategy guides.
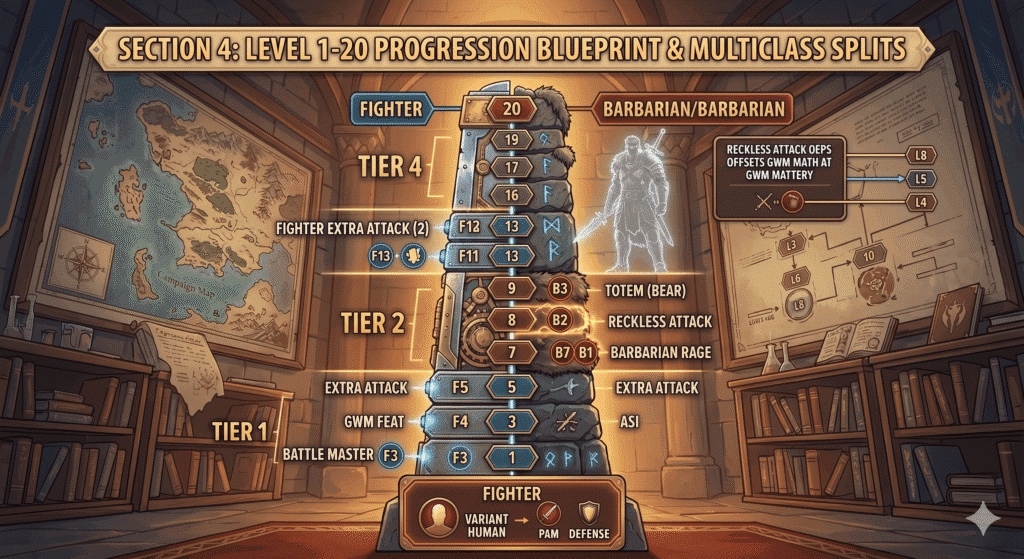
Section 4: The Level 1–20 Progression Blueprint & Multiclass Splits
When it comes to high-level 5e martial optimisation, you cannot simply pick a single class at Level 1 and expect to dominate the combat math all the way to Level 20. While a single-class Fighter is a solid choice, true optimisation demands that we extract the absolute best features from complementary classes. If you are also interested in how other popular systems balance character building, see our Pathfinder 2e character strategy guides for a parallel mechanical breakdown.
To create the ultimate melee combatant, we will build around the highest-performing martial chassis in the game: the Battle Master Fighter and Totem Warrior Barbarian multiclass. This specific combination maximises our action economy, grants the highest possible attack consistency through Advantage on demand, and ensures that our damage output scales relentlessly through every tier of play.
Below is the definitive, level-by-level progression blueprint to take your character from a Level 1 initiate to a Level 20 engine of destruction.
Level-by-Level Progression Roadmap
To keep your character at peak efficiency, follow this exact level path. It avoids delaying your most critical features—like Extra Attack—while introducing powerful multiclass mechanics at the perfect mathematical moments.
| Character Level | Class & Level | Key Feature Unlocked | Tactical Purpose in the Build |
| Level 1 | Fighter 1 | Polearm Master (PAM), Fighting Style | Establishes immediate Bonus Action and Reaction attacks. |
| Level 3 | Fighter 3 | Battle Master Archetype | Unlocks Superiority Dice for accuracy control (Precision Attack). |
| Level 4 | Fighter 4 | Great Weapon Master (GWM) | Completes the core feat synergy engine for the build. |
| Level 5 | Fighter 5 | Extra Attack | The first major Tier 2 power spike doubles your primary attacks. |
| Level 7 | Barbarian 1 | Rage | Introduces physical damage resistance and a flat melee bonus. |
| Level 8 | Barbarian 2 | Reckless Attack | Grants Advantage on demand to permanently offset the GWM accuracy tax. |
| Level 9 | Barbarian 3 | Primal Path (Bear Totem) | Grants resistance to all damage types except psychic. |
| Level 13 | Fighter 11 | Extra Attack (2) | The Tier 3 power spike grants a third main attack every round. |
| Level 17 | Fighter 15 | Relentless | Regain a Superiority Die when you roll initiative without any left. |
| Level 19 | Fighter 17 | Action Surge (2) | Allows you to output massive, double-action burst turns twice per rest. |
Tier 1: Levels 1 to 4 (Establishing the Foundation)
In the first tier of play, your primary goal is to establish your core combat loop as early as possible. Because this build relies on heavy feat combinations, our race choice is a mechanical necessity.
- Race: Variant Human or Custom Lineage. This grants a free feat at Level 1.
- Starting Feat: Polearm Master (PAM). By taking PAM at Level 1, your action economy is immediately superior to almost every other character at the table. On your turn, you make a main-hand attack with a Glaive or Halberd (1d10 + \text{Strength}) and a bonus action butt-end attack (1d4 + \text{Strength}). You also gain a reliable reaction attack when enemies enter your 10-foot reach.
- Fighting Style: Defence or Blind Fighting. While Great Weapon Fighting offers a minor damage boost, taking Defence grants a flat +1 to Armour Class, which offsets the lack of a shield. If your party frequently casts obscurement spells, Blind Fighting is the superior choice for generating Advantage.
The Fighter Level 3 Power Spike
At Level 3, take the Battle Master archetype. You gain four Superiority Dice (d8s) and three combat manoeuvres. For peak 5e martial optimisation, your selections must be:
- Precision Attack: This allows you to add a 1d8 to an attack roll after you see the dice result, turning near-misses into hits.
- Trip Attack: This knocks the target prone on a failed Strength save. Melee attacks against prone targets within 5 feet have Advantage, giving you another way to boost your accuracy.
- Menacing Attack: This imposes the frightened condition, preventing the enemy from moving closer to you and giving them Disadvantage on attack rolls.
Completing the Synergy Engine at Level 4
At Level 4, take the Great Weapon Master (GWM) feat. You now have both PAM and GWM active. Your baseline combat sequence is fully formed. You can take the -5 penalty on your 1d10 and 1d4 attacks to add +10 flat damage to every strike. If you miss by just a few points, you use Precision Attack to correct the roll.
Tier 2: Levels 5 to 10 (The Power Spike & Multiclass Break)
Tier 2 is where the damage potential of this build explodes. At Level 5, you gain Extra Attack.
Your standard round now consists of three distinct attacks: two main weapon strikes and one PAM bonus action strike. If you use Great Weapon Master on all three attacks, your flat damage modifier alone adds +30 damage per round, on top of your weapon dice and Strength modifiers.
Level 5 Attack Action:
Attack 1: Glaive Strike + Strength + 10 GWM
Attack 2: Glaive Strike + Strength + 10 GWM
Bonus Action: PAM Butt-End Strike + Strength + 10 GWM
Entering the Barbarian Chassis
At Level 7 (Character Level 7, Fighter 6 / Barbarian 1), we initiate our multiclass strategy by taking our first level in Barbarian. This grants Rage, which provides resistance to bludgeoning, piercing, and slashing damage, along with a +2 damage bonus on every attack that uses Strength.
At Character Level 8 (Fighter 6 / Barbarian 2), the core thesis of this 5e martial optimisation blueprint comes to fruition: Reckless Attack.
From this moment onward, you can choose to have Advantage on every single melee attack you make during your turn. This mathematically overrides the -5 GWM penalty, ensuring that your three attacks hit with terrifying consistency.
Defining Your Subclass at Level 9
At Character Level 9 (Fighter 6 / Barbarian 3), select the Path of the Totem Warrior (Bear Totem). Your Rage now grants resistance to all damage types except psychic. You are no longer just the highest damage dealer in the party; you are also an impenetrable wall that can take double the punishment of any other frontline character.
Tier 3: Levels 11 to 16 (The Scaling Phase)
Once you have secured your 3-level Barbarian dip, return immediately to the Fighter class to push toward your next major power milestone.
The Level 11 Milestone (Character Level 14)
At Fighter Level 11, you unlock the absolute pinnacle of martial damage scaling: Extra Attack (2). This grants a third main attack whenever you take the Attack action.
Let us analyse the raw, round-by-round math of a Level 14 character. Assume a Strength score of 18 (+4 modifier), Rage active, Reckless Attack generating Advantage on every swing, and GWM applied to every strike.
Level 14 Round-by-Round Damage Calculation:
- Attack 1: 1d10 + 4 \text{ Strength} + 2 \text{ Rage} + 10 \text{ GWM} = \mathbf{21.5 \text{ average damage}}
- Attack 2: 1d10 + 4 \text{ Strength} + 2 \text{ Rage} + 10 \text{ GWM} = \mathbf{21.5 \text{ average damage}}
- Attack 3: 1d10 + 4 \text{ Strength} + 2 \text{ Rage} + 10 \text{ GWM} = \mathbf{21.5 \text{ average damage}}
- Bonus Action (PAM): 1d4 + 4 \text{ Strength} + 2 \text{ Rage} + 10 \text{ GWM} = \mathbf{18.5 \text{ average damage}}
Total Consistent Round Output: 83 \text{ damage} per turn.
Keep in mind that this damage requires absolutely zero limited resources. You can output this level of damage every single round of every single encounter, long after the party’s spellcasters have exhausted their high-level slots.
Tier 4: Levels 17 to 20 (The Peak of Martial Optimisation)
In the final tier of play, your character transitions into an unstoppable force on the battlefield.
- Character Level 17 (Fighter 14 / Barbarian 3): Use your Fighter ASIs to maximise your Strength score to 20 and pick up the Sentinel or Tough feat. Sentinel gives you total battlefield lockdown, ensuring that enemies cannot move past you to strike your backline.
- Character Level 19 (Fighter 16 / Barbarian 3): Take another ASI to boost your Constitution, further increasing your HP pool.
- Character Level 20 (Fighter 17 / Barbarian 3): You unlock your second use of Action Surge.
At this ultimate level, you can initiate a combat turn by taking the Attack action, activating Action Surge, and attacking again. That is a total of six main-hand attacks and one PAM bonus attack in a single round. Combined with Reckless Attack and Great Weapon Master, you can reliably deal over 150 \text{ damage} in a single turn, completely deleting boss monsters and legendary threats before they can even act.
Section 5: Tactical Execution & Combat Scenarios
Understanding the underlying math of 5e martial optimisation is one thing, but translating those raw numbers into victory on the tactical grid is another entirely. A character built for peak performance only reaches its true potential when its pilot knows exactly how to manipulate action economy, positioning, and resources in real-time—skills that carry over perfectly to taking effective character notes during a campaign.
To help you get the most out of your build, let’s explore two common high-stakes combat scenarios and break down the exact sequence of choices that will allow you to dominate the battlefield.
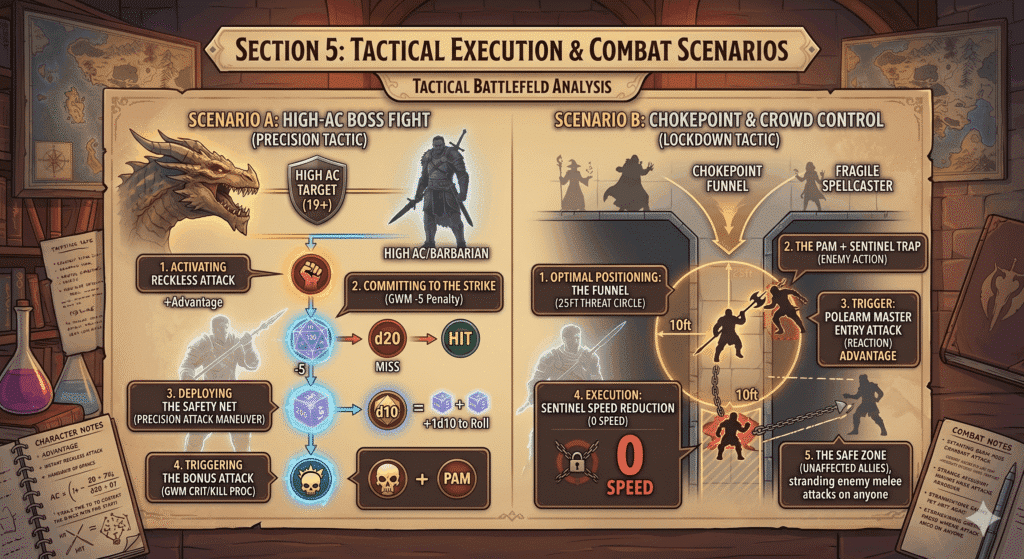
Scenario A: The High-AC Boss Fight (Accuracy over Raw Power)
You are facing a formidable enemy, such as an adult dragon or a heavily armoured warlord with an Armour Class (AC) of 19 or higher. At this level, blindly using the Great Weapon Master (GWM) penalty can lead to frustrating misses and lost damage output.
This is where the tactical versatility of your 5e martial optimisation chassis shines. Your goal here is to manipulate the attack roll math to ensure that the +10 damage bonus lands reliably.
The Tactical Turn Sequence:
- Activate Reckless Attack: On the first attack of your turn, declare that you are attacking recklessly. This immediately grants you Advantage on all Strength-based melee attacks for the round. Having an advantage is mathematically equivalent to a +3 to +5 bonus that directly offsets the GWM penalty.
- Commit to the Strike: Roll your first attack with the GWM penalty applied.
- Use the Battle Master Safety Net: If your total roll just barely misses the boss’s AC, expend a Superiority Die to use the Precision Attack manoeuvre. Add the 1d8 or 1d10 die result to your attack roll. By combining Advantage with Precision Attack, you convert a potential miss into a devastating hit.
- Trigger the Bonus Attack: If your attack reduces the boss to 0 hit points or scores a critical hit—which is twice as likely to happen when rolling with permanent Advantage—you immediately use your Bonus Action to make an additional standard melee attack via GWM, bypassing the lower-damage PAM butt-end strike.
Scenario B: The Chokepoint & Crowd Control (Lockdown Tactic)
Your party has been ambushed in a dungeon corridor or narrow pass. A horde of swift, hard-hitting melee skirmishers is attempting to bypass your position to target your spellcasters and ranged combatants.
In this scenario, your role changes from a raw damage dealer to an immovable tactical anchor. By utilising the 10-foot reach of your polearm alongside the ultimate lockdown feat combination, you can control the flow of combat entirely by yourself.
Enemy Enters Your 10-foot Threat Radius
–> Reaction Attack triggers instantly via Polearm Master
–> Attack hits, and the enemy’s movement drops to 0 via Sentinel
–> Enemy is stranded 10 feet away, unable to hit you or your allies!
The Tactical Turn Sequence:
- Positioning is Everything: Position yourself directly in the chokepoint. With a glaive or halberd, you threaten a 25-foot diameter circle of the battlefield.
- The PAM + Sentinel Trap: Do not use your reaction on your turn. Instead, wait for the enemy to act. The moment a skirmisher moves into your 10-foot reach, the Polearm Master feat triggers an immediate opportunity attack.
- Deploy the Lockdown: Roll your opportunity attack. On a hit, the Sentinel feat drops the enemy’s speed to exactly 0 for the rest of the turn.
- The Safe Zone: Because the enemy’s speed is zero and they are still 10 feet away from you, they are effectively stranded. Most melee enemies only have a 5-foot reach, meaning they cannot attack you or anyone else. On your next turn, you can safely strike them from 10 feet away without ever stepping into their threat range.
Section 6: Conclusion & The Martial Mandate
As we have seen, the common narrative that martial characters cannot keep up in high-level 5e combat is simply a myth. Through the lens of true 5e martial optimisation, a character can easily bridge the gap. By systematically combining the right weapon choices, passive fighting styles, and high-impact feats like Polearm Master and Great Weapon Master, you can build a character that not only survives the frontline but absolutely dominates it.
The secret is all in the action economy. Whether you are generating Advantage on demand with Reckless Attack or converting near-misses into crushing blows with Precision Attack, the tactical depth is there for players who are willing to run the math.
Having seen character options evolve through three decades of this hobby, from the dense tables of older editions to the streamlined mechanics of today, the core truth of roleplaying remains identical: character planning pays off. You don’t need magic spells to warp the battlefield when you have a 10-foot reach, a reliable bonus action attack, and a flat +10 damage bonus ready to unleash on every single swing.
Join the Discussion
What is your personal favourite melee build to play in 5e? Do you prefer the raw damage of the Battle Master / Barbarian multiclass chassis, or do you enjoy adding a touch of magic with a Paladin / Hexblade split?
Drop your thoughts, questions, and favourite character builds in the comments below. Let’s talk tactics!
Frequently Asked Questions (FAQ)
Does taking the -5 penalty from Great Weapon Master always make sense mathematically?
Not always. In high-level 5e martial optimisation, you should only use the GWM penalty if the target’s Armour Class (AC) is 17 or lower when you have a normal attack modifier of +7 or higher.
If the target has an exceptionally high AC (18+) or if you have Disadvantage on the attack, do not take the penalty. The math changes significantly if you have a reliable way to generate Advantage (such as a Barbarian’s Reckless Attack). With Advantage, you can confidently take the -5 penalty against ACs up to 20 or 21 and still come out ahead on average damage per round.
Is dual-wielding viable for scaling melee damage to level 20?
Unfortunately, Two-Weapon Fighting drops off significantly in Tier 3 and Tier 4 (Levels 11 to 20). In early tiers (Levels 1 to 4), dual-wielding is competitive. However, because the bonus action attack does not scale alongside the Fighter’s multiple main attacks, it eventually falls behind.
You can mitigate this early game through better physical equipment; see our breakdown of the best physical tabletop accessories to find gear that supports your rolling and in-game tracking.
Should I max out my Strength to 20 first, or take feats like PAM and GWM?
In 5e, feats take priority over Ability Score Improvements (ASIs) when optimising for damage.
Taking Polearm Master at Level 1 immediately doubles your action economy by giving you a Bonus Action attack and a Reaction attack. Taking Great Weapon Master at Level 4 adds a massive flat damage modifier.
While increasing your Strength to 18 or 20 improves your baseline accuracy by +1, the mechanical weight of gaining extra attacks and +10 damage outweighs the +1 to hit. Focus on grabbing your core feats first, then use your Tier 2 and Tier 3 ASIs to max out your Strength.
How does 5e martial optimisation compare to older editions like AD&D or 3.5e?
In AD&D, martial combat was defined by specific weapon specialisation tables and flat THAC0 progression. It was highly straightforward but offered few tactical choices on your turn. In 3.5e, optimisation was all about navigating dense feat trees to chain together massive multipliers (like combining Leap Attack with Shock Trooper).
5e strikes a balance. It simplifies the math by replacing complex numeric modifiers with the Advantage/Disadvantage system, but keeps the tactical depth through specific feat synergies. Instead of stacking a dozen small numeric bonuses, modern players optimise by manipulating the action economy and using feats to generate reliable Advantage.
Is the Polearm Master + Sentinel combo considered “cheese,” and how do I use it effectively?
While some call it “cheese” because of how effectively it controls the battlefield, it is entirely legal within the core rules of the game.
The synergy works because Polearm Master triggers an opportunity attack the moment a creature enters your reach (10 feet with a glaive or halberd), and Sentinel immediately drops their movement speed to 0 on a hit. This leaves the creature stranded out of range to hit you back. You can confirm exactly how these reach mechanics interact with reactions by reviewing the official Sage Advice rulings on reach and opportunity attacks.

Andragoras is a TTRPG veteran with over 30 years of experience behind the DM screen and as a player. Specialising in high-level mechanical optimisation and narrative table management, they have navigated systems from the early days of AD&D to the tactical depths of Pathfinder 2e and the narrative systems of Star Wars FFG. Their mission at RPG Player Hub is to help players and Game Masters master their craft through professional-grade guides and system-agnostic roleplay mastery.
2 responses