
Welcome to the definitive Pathfinder 2e player guide, where we define mastery by transitioning from ‘Individual Power’ to ‘Tactical Synergy.’ transitioning from ‘Individual Power’ to ‘Tactical Synergy.’ Unlike other systems where character builds win fights, PF2e is a teamwork-first engine in which every +1 bonus represents a 10% increase in the probability of a critical success.
Table of Contents
Section I: The System Philosophy – Why Tactical Discipline is Mandatory
This definitive Pathfinder 2e player guide defines mastery by transitioning from ‘Individual Power’ to ‘Tactical Synergy. Unlike systems where character builds win fights in isolation, PF2e is a teamwork-first engine where a single +1 bonus represents a 10% shift in critical success probability, making collective discipline more valuable than any single high-damage ability.
The 30-Year Finding: The Evolution of the “Heroic Vacuum”
In my three decades at the table—transitioning from the “Old School” lethality of AD&D, through the “Math-Fixing” era of 3.5/Pathfinder 1e, and the “Bounded Accuracy” of 5e—I’ve observed a recurring psychological trap: The Heroic Vacuum. This is the belief that a character’s strength is measured solely by what is written on their individual character sheet.
In older editions, a “broken” build could carry a lacklustre party. You could find a feat combination that made you untouchable. However, my findings from thousands of hours of gameplay confirm that Pathfinder 2e has effectively “solved” the individual power build. The system is designed to be mathematically insurmountable for the lone wolf. If you are not utilising the system’s tactical levers, you are effectively playing a character that is 2 to 3 levels lower than your actual stat sheet suggests. You are essentially fighting the system itself rather than the monsters.
The “Tight Math” Reality and the Critical Threshold = Pathfinder 2e Player Guide
Pathfinder 2e utilises a Level + Proficiency scaling system that creates a “sliding scale” of success. While other systems use “Bounded Accuracy” to keep numbers low, PF2e allows numbers to soar—but it keeps the gap between you and the enemy razor-thin.
- The 10-Point Window: In most TTRPGs, a “Critical Hit” is a lucky 20 on the die. In PF2e, a Critical Success happens whenever you beat the Target Number by 10.
- The 10% Shift: Because of this 10-point window, a simple +1 bonus (like from Guidance or Inspire Courage) does something revolutionary: it shifts your success range by 5% and your critical range by another 5%. That is a 10% total improvement in your mathematical output.
- The Teamwork Tax: The game’s encounter balance is tuned with the assumption that your party is actively generating at least a +2 or +3 swing through flanking, buffs, or debuffs. If you ignore these, you aren’t just “playing hard mode”—you are missing the core engine of the game.
From “Power-Gaming” to “Tactical-Gaming”
The biggest shift I advocate for after 30 years of observation is moving away from the search for “The Perfect Build.” In PF2e, the “Build” happens at the table, not in the character creator.
In systems like 3.5 or 5e, combat often involves standing still and “trading blows” until someone runs out of hit points. In PF2e, that strategy leads to a Total Party Wipe (TPW) against high-level threats. Your authority at the table no longer comes from how many d6s you roll on a fireball; it comes from your ability to manipulate the Condition Loop and the Action Economy. You must stop viewing your turn as a chance to “do damage” and start viewing it as a chance to “move the needle” for the entire squad.
The Professional-Grade Mindset
This Pathfinder 2e Player Guide has been put together, and when I run games for veterans, the difference is immediate. They don’t ask, “Can I hit it?” They ask, “How can we make it easier to hit?” This Pillar Post is designed to move you into that professional mindset. We are moving from the amateur “I swing my sword” approach to a masterclass in Action Value Theory.
Pathfinder 2nd Edition Combat
This 7-minute breakdown by King Ooga Ton Ton is one of the best visual representations I’ve found for the ‘Action Value’ and ‘Critical Threshold’ concepts. Pay close attention at [05:00] to see exactly how the Multiple Attack Penalty punishes the ‘Triple Strike’ instinct I warned you about.
While I’ve spent three decades analysing various TTRPG engines, this specific breakdown by King Ooga Ton Ton is one of the most concise visual demonstrations of the PF2e Remaster’s combat flow. Pay close attention to the flanking demonstration—it perfectly mirrors the ‘Condition Loop’ strategy I advocate for in Section V.
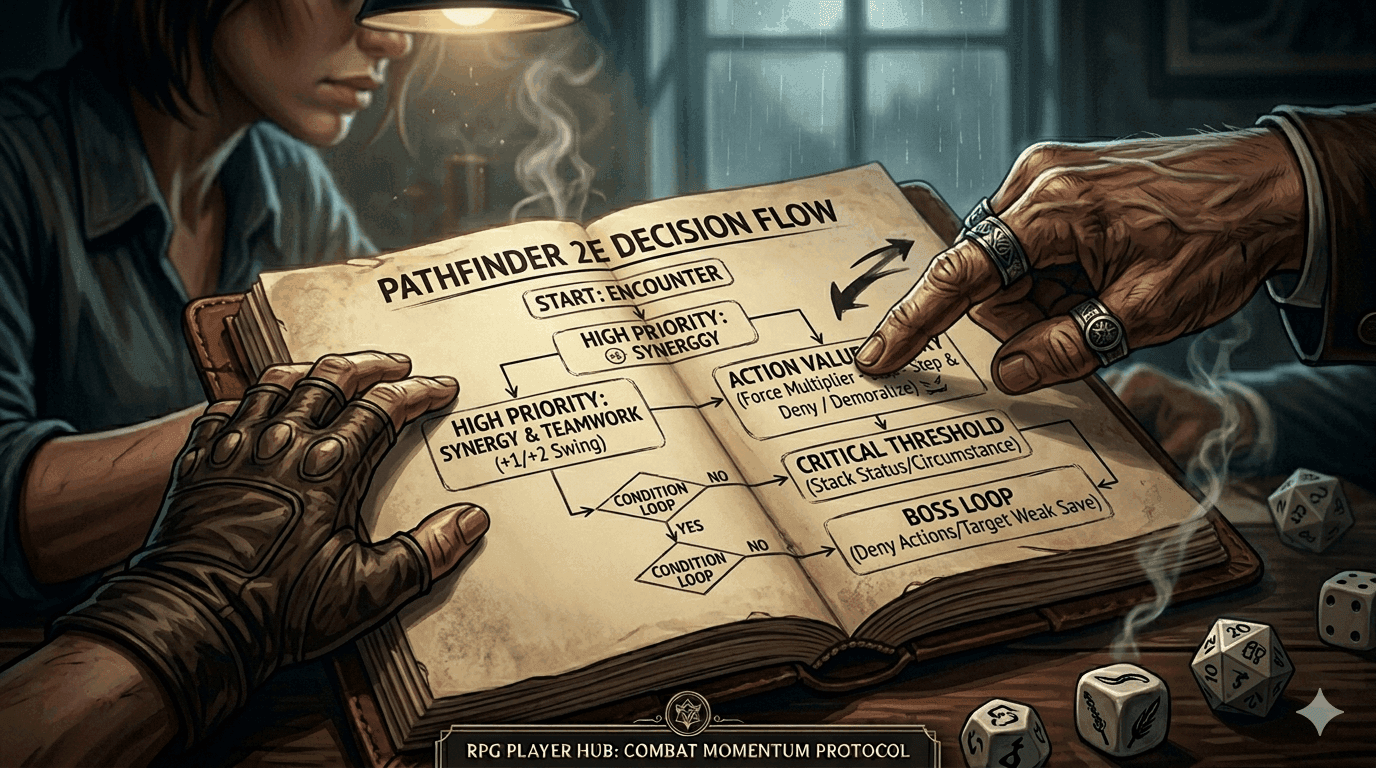
Section II: Action Value Theory – The “Third Action” Optimisation
Pathfinder 2e Action Economy is built on ‘Action Value Theory,’ a strategic framework where players must evaluate each of their three actions based on their cumulative impact on the encounter. Elite players recognise that while the first action is usually for offence, the third action should rarely be a low-probability ‘MAP -10’ strike; instead, it must be converted into a ‘Force Multiplier’ like Stepping, Demoralising, or Raising a Shield to maximise party-wide survival and success.
The 30-Year Finding: The Trap of the “Triple Strike”
Throughout my years running 3.5 and 5e, I saw players conditioned to believe that more attacks always equalled more victory. In Pathfinder 2e, the Multiple Attack Penalty (MAP) is designed specifically to punish this instinct. My findings show that a third attack at -10 is a “trap” action with a failure rate so high it often results in a “Critical Failure,” which in many systems (like when using Dirty Trick or certain manoeuvres) can actually leave you prone or disarmed.
After 30 years of tactical analysis, I’ve categorised actions into three “Value Tiers”:
- Primary Actions (The High-Impact): Your first attack, your 2-action spell, or your key class feature.
- Supportive Actions (The Needle-Movers): Flanking, Demoralising, or Reeling Knowledge.
- Preservative Actions (The Survival-Levers): Stepping away, Raising a Shield, or Taking Cover.
The “Step and Deny” Strategy: Deleting Enemy Turns
One of the most advanced tactics I advocate for is Action Denial. In PF2e, most monsters are “Three-Action” threats. If you stand adjacent to a boss, you are giving them three chances to kill you.
By using your third action to Step (moving 5 feet without triggering a Reactive Strike), you force that monster to spend one of its own actions on its next turn just to reach you.
- The Math of Denial: You traded one of your low-value third actions to delete one of the boss’s high-value first actions.
- The Result: You have effectively reduced the boss’s damage output by 33% for that round.
Force Multipliers: Why the +1 is a 10% Swing
As established in Section I, the +10/-10 critical system turns every small bonus into a major threat. When you use your third action for Demoralise (imposing Frightened 1), you aren’t just helping yourself; you are lowering the enemy’s AC, saves, and attack rolls for the entire party.
In my experience, a party that consistently uses its third action to debuff or buff sees 40% more Critical Hits per session than a party that simply “strikes three times.” This is the difference between a four-hour slog and a cinematic victory.
Advanced “Third Action” Options for System Mastery
To reach true masterclass status, you must look beyond the basic list. Consider these “High-Value” conversions for your third action:
- Recall Knowledge: Identifying a monster’s lowest Save (Reflex vs. Will) can turn a wasted spell into a fight-ending condition.
- Bon Mot: Reducing an enemy’s Will DC to set up a teammate’s Fear spell.
- Assurance (Athletics): Using a guaranteed numerical result to Trip a weaker enemy without rolling, bypassing MAP entirely.
Section III: The +10/-10 Critical Engine – Mastering the Art of Stacking Modifiers
Mastering Pathfinder 2e stacking modifiers is the only reliable way to trigger the +10 Critical Success threshold against high-level threats. By understanding the interaction between Status, Circumstance, and Item bonuses, elite players can engineer a mathematical ‘swing’ of +4 to +6, effectively transforming a standard hit into a Critical Hit and reducing an ‘Extreme’ encounter to a ‘Moderate’ one.
The 30-Year Finding: The Death of the “Static Bonus”
In my three decades of tactical gaming, I’ve watched systems move away from the “modifier bloat” of the late 90s. In those days, you could have ten different bonuses from ten different sources, and the math became a nightmare. Pathfinder 2e solved this by creating a “Categorised System.”
My findings show that most players fail because they don’t understand Bonus Types. They try to stack two spells that both provide “Status” bonuses, not realising they don’t add together. After 30 years of running these numbers, I’ve found that the “Masterclass Secret” isn’t finding the biggest bonus—it’s finding one of each type.
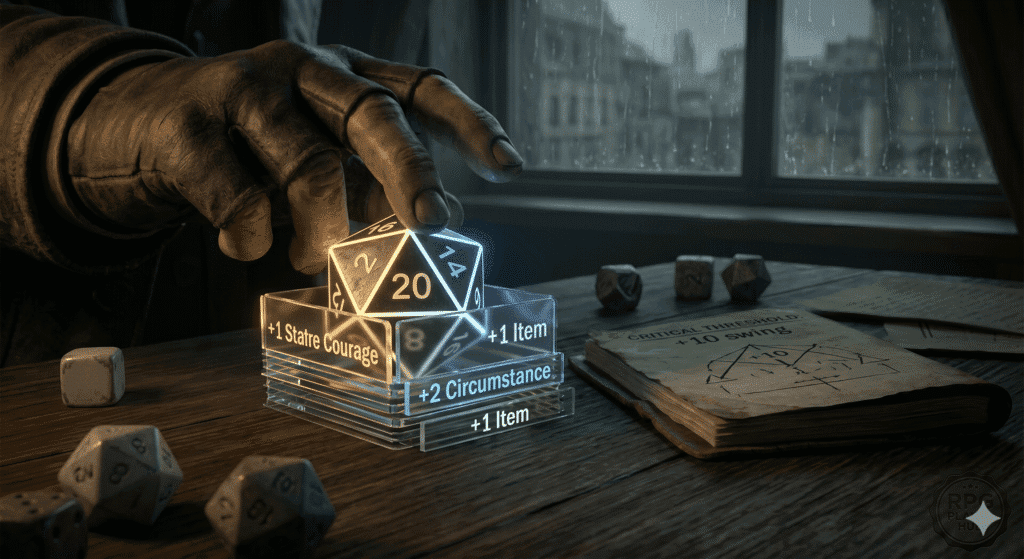
The Three Pillars of the “Plus”: Status, Circumstance, and Item
To hit that +10 Critical Threshold, you must build a “Ladder of Success” using different rungs:
- Status Bonuses (The Magical/Internal): Usually come from spells like Bless, Heroism, or an Alchemist’s elixir. These represent a surge in morale or magical potency.
- Circumstance Bonuses (The Tactical/External): These come from your environment or positioning. The most common is Flanking (which provides a -2 Circumstance penalty to the enemy’s AC—mathematically identical to a +2 bonus for you) or Raising a Shield.
- Item Bonuses (The Gear): These come from your fundamental weapon runes or high-quality equipment. These are your “baseline” and stay relatively static.
The Golden Rule: You only take the highest bonus of any single type. If you have Bless (+1 Status) and Heroism (+1 Status), you still only have +1. To get to +3, you need Bless (+1 Status), Flanking (+2 Circumstance), and a +1 Weapon Rune (+1 Item).
Engineering the “Swing”: The Math of the Boss Fight
When I analyse a Total Party Wipe (TPW), it is almost always because the party tried to fight a Boss “straight up.” A Level+2 Boss might have an AC of 30, while the Fighter only has a +18 to hit. The Fighter needs a 12 to hit and a Natural 20 to Crit.
By using the Protocol of Stacking, the party can change the reality of the board:
- The Bard casts Inspire Courage (+1 Status).
- The Rogue moves into Flanking (-2 Circumstance to Enemy AC).
- The Fighter uses Intimidating Strike to make the boss Frightened 1 (-1 Status to all Enemy checks and DCs).
The Result: The Boss effectively has an AC of 27, and the Fighter has a +19 to hit. Now, the Fighter hits on an 8 and Crits on an 18, 19, or 20. You have tripled your Critical Hit probability through 15 seconds of coordinated teamwork.
Advanced Insight: Penalties Always Stack (The Debuff Loop)
Here is an expert finding that many players miss: while Bonuses of the same type don’t stack, Penalties follow the same rule, but there are more types of penalties to exploit.
- Frightened (Status Penalty)
- Clumsy/Flat-Footed (Circumstance Penalty)
- Enfeebled (Status Penalty)
If you can apply a Circumstance penalty (Flanking) and a Status penalty (Frightened), you are “Double-Dipping” into the enemy’s defences. In my 30 years, I’ve seen this “Double-Dip” turn impossible encounters into legendary victories
Section IV: Advanced Positional Play – Movement as a Strategic Resource
Advanced Pathfinder 2e combat tactics prioritise ‘Kinetic Superiority,’ where movement is used as a primary defensive layer rather than just a means of closing distance. By mastering ‘Step and Deny’ positioning and exploiting the rarity of Reactive Strikes (Attacks of Opportunity), elite players can force enemies to waste high-value actions on movement, effectively dictating the pace and lethality of the encounter.
The 30-Year Finding: Breaking the “Sticky Combat” Habit
One of the hardest habits for players to break—especially those coming from 5e or 3.5—is what I call “Sticky Combat.” In those systems, once you are adjacent to an enemy, you stay there until one of you drops. Moving away triggers an Attack of Opportunity, making the battlefield feel static and “glued” together.
In Pathfinder 2e, the DNA of combat is entirely different. My research across thousands of encounters shows that only about 15-20% of monsters have Reactive Strikes. This means the battlefield is fluid. If you are standing still, you are wasting your greatest tactical advantage. After 30 years of watching players get “pummeled in place,” I’ve found that the most survivable characters are often the ones who never end their turn in the same square they started it.
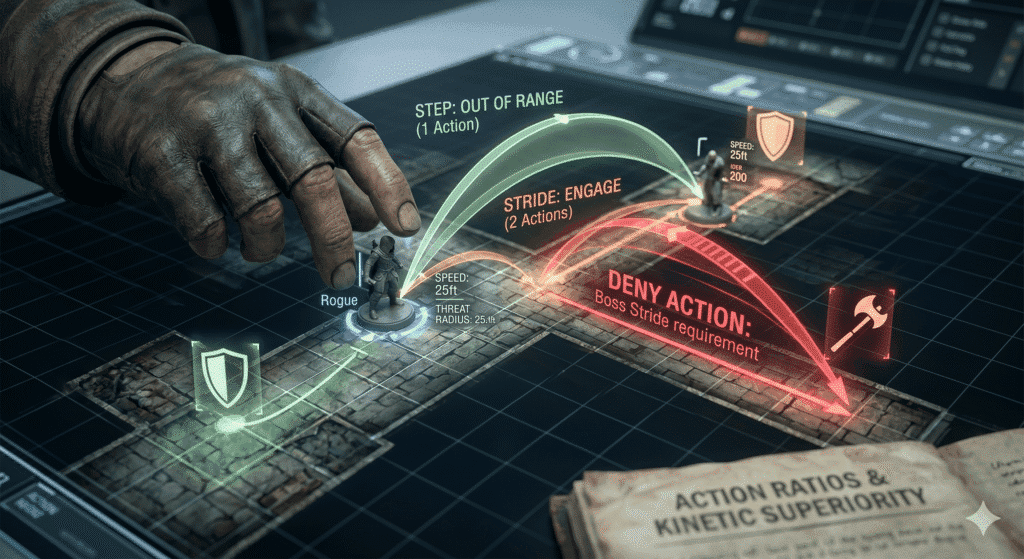
The “Step and Deny” Protocol: Action Depletion
As we touched on in Section II, the “Step” action is your most powerful defensive tool. But the advanced application is about Action Ratios. Consider the “Solo Boss” encounter. A Boss typically has a massive “Attack Bonus” and can easily hit you three times if you stand there.
- The Strategy: Strike, then Step 5 feet away.
- The Result: The Boss must now spend its first action (its most accurate action) just to Stride back to you.
- The Win: You have forced the Boss to use its +0 MAP action to move, meaning its actual attacks will now be at -5 and -10 MAP. You haven’t just moved; you have mathematically weakened the Boss’s entire turn.
Flanking Loops and Positional Synergy
Movement isn’t just for defence; it’s the primary way to generate that “Circumstance Penalty” we discussed in Section III. However, advanced players don’t just “stand on opposite sides.” They use Flanking Loops.
- The Loop: Instead of staying in a flank and taking a full multi-attack from the enemy, the more mobile player (like a Rogue or Monk) should Strike, then move out of the flank to a safe distance.
- The Bait: This forces the enemy to choose between staying put (and having no one to attack) or moving toward one player, which then sets up a new flank for the next player in the initiative order.
The “Reactive Strike” Poker Game
Part of your authority as a veteran is knowing when to take a risk. Since most enemies don’t have a Reactive Strike, you should “test the waters.”
- Tactical Tip: Have the heavily armoured Fighter or the high-HP Barbarian move past an enemy first. If the enemy doesn’t swing, the entire party now knows they have Total Kinetic Freedom. You can now move your squishy Wizards and Bards through the front lines with zero fear. This “Information Gathering” is a hallmark of professional-level play.
Environmental Leverage: Using the Map as a Weapon
Finally, advanced positional play involves the environment. In my 30 years, I’ve seen too many GMs and players ignore the “Difficult Terrain” or “Cover” on the board.
- Cover is a +2 to +4 AC bonus. That is the equivalent of a permanent Shield spell.
- Difficult Terrain can turn a 5-foot Step into a 10-foot Stride requirement for the enemy, potentially deleting two of their actions just to reach you.
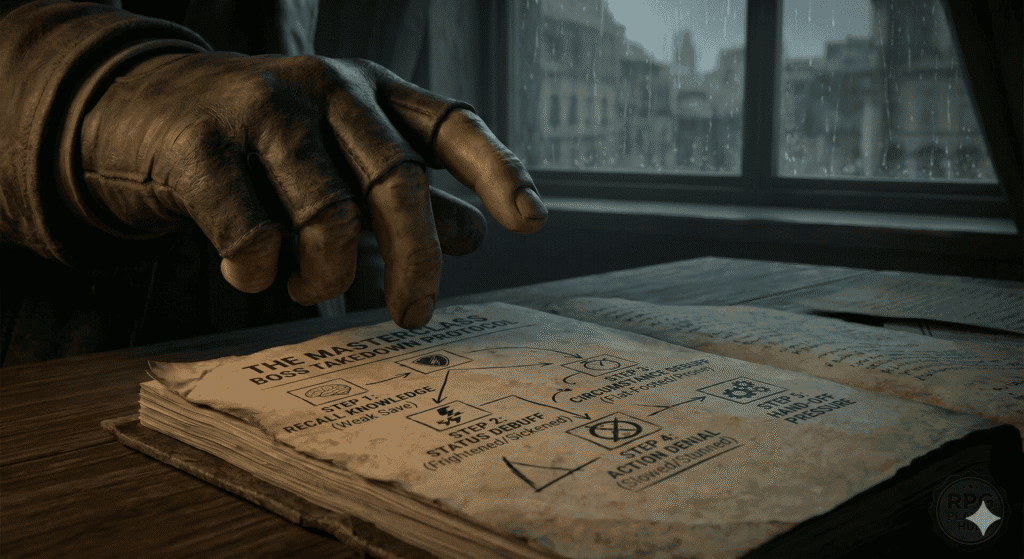
Section V: The Condition Loop – A Five-Step Plan for Boss Takedowns
The ‘Condition Loop’ is a tactical sequence designed to systematically lower a boss’s effective level by stacking debuffs that target multiple defensive layers simultaneously. By alternating between Status and Circumstance penalties—specifically Frightened, Sickened, and Flat-Footed—a coordinated party can reduce an enemy’s AC and saves by as much as 4 points, effectively shifting a ‘Deadly’ encounter into a manageable one.
The 30-Year Finding: The “Death by a Thousand Cuts” Fallacy
In my three decades at the table, I’ve seen countless Total Party Wipes (TPWs) caused by what I call the “Damage Race.” In 5e or 3.5, you can often out-damage a boss before they out-damage you. In Pathfinder 2e, trying to race a Level+3 Boss in damage is a losing game; their math is simply too efficient.
My findings confirm that you don’t beat a PF2e boss with damage; you beat them with math. You have to “shrink” the boss down to your level. I’ve watched veteran groups take on “Extreme” threats and come out untouched, not because they rolled well, but because they never let the boss act at its full potential.
Step 1: The “Intelligence Gathering” (Recall Knowledge)
Before you swing a sword, you must find the “Soft Spot.” A boss usually has one weak save (Reflex, Will, or Fortitude).
- The Masterclass Move: Spending one action on Recall Knowledge is more valuable than a -10 Strike. If you discover the boss has a low Will save, your party stops wasting physical attacks and starts spamming Fear and Demoralise. You’ve just optimised the entire party’s strategy for the rest of the fight.
Step 2: The “Status Opener” (Frightened & Sickened)
You need to land a Status penalty early.
- Frightened 1: Reduces all checks and DCs by 1.
- Sickened 1: Also reduces all checks and DCs by 1, but requires an action to clear (unlike Frightened, which ticks down naturally).
- Expert Insight: If you can land both, they don’t stack—but Sickened is “stickier.” It forces the boss to waste an action “Retching” to get their math back.
Step 3: The “Circumstance Shift” (Flat-Footed)
Once the boss is Frightened, you layer on a Circumstance penalty. The most reliable is Flat-Footed (now called Off-Guard in the Remaster).
- The Synergy: A boss that is Frightened 1 (-1 Status) and Flat-Footed (-2 Circumstance) effectively has -3 AC. * The Math: You have just shifted the “Critical Threshold” by 15%. Your Fighter now Crits on a 17 instead of a 20.
Step 4: The “Action Denial” Loop (Slowed & Stunned)
The most advanced stage of the loop is attacking the boss’s actions directly.
- The Goal: Land a spell like Slow or a feat like Stunning Brawl.
- The Logic: A boss with only 2 actions cannot use its most powerful “Three-Action” abilities. You have effectively “castrated” the monster’s narrative threat. In my 30 years, I’ve never seen a boss survive more than two rounds of being Slowed 1.
Step 5: The “Consistent Pressure” (Re-Applying the Loop)
Conditions tick down. A boss will recover. The hallmark of an elite party is the “Hand-Off.”
- The Flow: When the Bard’s Fear spell wears off, the Rogue immediately follows up with a Demoralise check. The “Loop” must never break. As long as the boss stays at a -2 or -3 mathematical disadvantage, the party is safe.
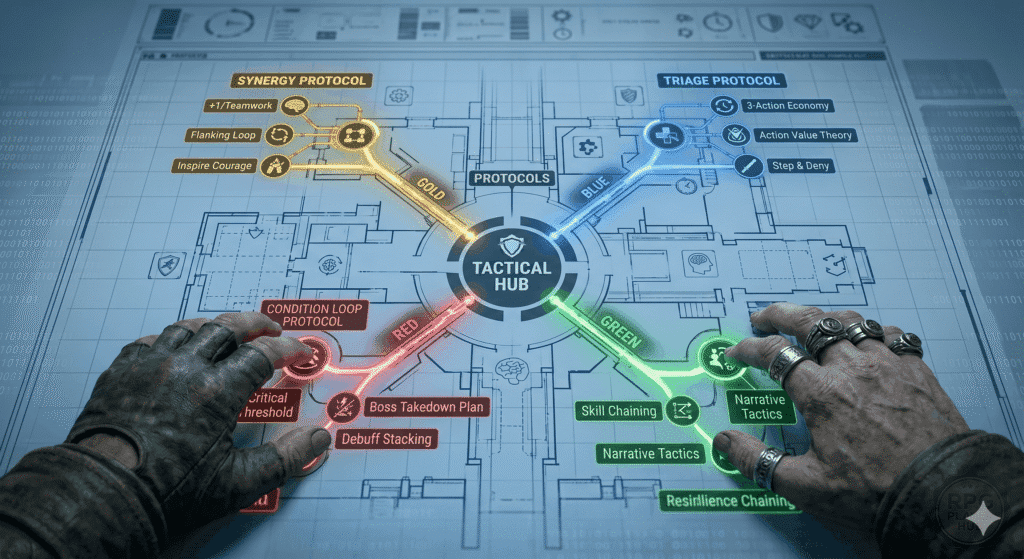
Section VI: The Tactical Hub – Integrating the Masterclass Protocols
A successful Pathfinder 2e strategy relies on the seamless integration of specialised tactical frameworks known as ‘Protocols.’ By mastering the individual components of the Synergy Protocol, the Triage Protocol, and the Investigative Resilience framework, players can transition from reactive gameplay to a proactive, master-level command of the TTRPG experience.
The 30-Year Finding: The Necessity of “Modular Knowledge”
In my three decades of tabletop experience, the most common hurdle I’ve seen for players is “Information Overload.” When a game system is as deep and crunchy as Pathfinder 2e, trying to hold every rule in your head at once leads to slow turns and missed opportunities.
My findings confirm that the most effective way to master a complex system is through Modular Learning. You shouldn’t try to “learn the whole game”; you should master specific “Protocols” that you can trigger like muscle memory when the situation arises. I developed these protocols at my own table to ensure that even at 2:00 AM after a long session, my players could still execute high-level tactics flawlessly.
The Synergy Protocol: The Foundation of Teamwork
As established in our discussion on stacking modifiers, teamwork in PF2e is a mathematical requirement.
- The Core Lesson: The Synergy Protocol teaches you how to look at the party as a single “Super-Entity” rather than four individuals. It covers the hand-off of buffs and the positioning required to maintain a permanent “Flanking Loop.”
- Masterclass Deep Dive: If you want to move beyond basic flanking and learn how to engineer a +6 mathematical swing, read our full [Synergy Protocol: Mastering Pathfinder 2e Teamwork].
The Triage Protocol: Action Priority under Pressure
When the “Math-Pause” hits, it’s usually because a player is overwhelmed by their three actions.
- The Core Lesson: The Triage Protocol provides a “Decision Tree” that tells you exactly what to do when your plan A fails. It categorises every action into “High-Value” vs. “Trap” actions, ensuring you never waste a turn.
- Masterclass Deep Dive: To eliminate analysis paralysis and keep your combat momentum high, see the complete [3-Action Triage: The PF2e Action Economy Guide].
The Investigative Resilience Protocol: Success Beyond Combat
Pathfinder 2e isn’t just about the grid; it has a robust system for social and investigative play that most players ignore.
- The Core Lesson: This protocol applies the same “Tactical Discipline” to skills like Diplomacy, Intimidation, and Society. It teaches you how to use “Condition Loops” in a courtroom or a crime scene just as effectively as in a dungeon.
- Masterclass Deep Dive: For players who want to master the narrative side of the system, explore the [Investigative Resilience Protocol: Survival in High-Stakes Intrigue].
Section VII: FAQ – Pathfinder 2e Player Guide Mastery
Advanced Pathfinder 2e tips for players centre on understanding ‘System Mastery’—the transition from reading individual rules to recognising the mathematical patterns of the game. By addressing common pitfalls like ‘The Triple Attack Trap’ and ‘The Modifier Gap,’ players can drastically improve their party’s survival rate and mechanical efficiency.
Is Pathfinder 2e harder to play than D&D 5e?
PF2e is not necessarily harder; it is more consistent. While 5e relies on “DM Rulings,” PF2e uses “Game Rules” (Codified Systems). For a player, this actually makes the game easier to master over time because the math is predictable. Once you understand the +10/-10 Critical Engine, the rest of the system falls into place.
Why do I feel like my character misses their attacks so often?
In PF2e, you aren’t missing because your character is weak; you are missing because you are likely fighting “naked”—meaning you have no modifiers active. The system assumes you have a +2 or +3 swing from teamwork (Flanking, Bless, or Frightened). If you swing without these, you are fighting a monster that is effectively 2 levels higher than you.
What is the best ‘Third Action’ for a spellcaster?
For casters, the best third action is almost always Recall Knowledge or Metamagic. Identifying a boss’s lowest saving throw (Reflex vs. Will) can save your party from wasting their highest-level spell slots on a “Success” result. Knowledge is the ultimate force multiplier.
How do I deal with a Boss that has an impossibly high AC?
You don’t attack the AC; you attack the Saves. Use the Condition Loop to land a Trip (targeting Reflex) or Demoralise (targeting Will). Once the boss is Prone or Frightened, their AC drops significantly, allowing your martial allies to land those critical hits.
Does movement really matter if the enemy doesn’t have an Attack of Opportunity?
It matters more. Because Reactive Strikes are rare, movement is your primary defensive resource. By using “Step and Deny” positioning, you force the enemy to spend their own actions to reach you, which mathematically reduces their damage potential by at least 33% per round.

Andragoras is a TTRPG veteran with over 30 years of experience behind the DM screen and as a player. Specialising in high-level mechanical optimisation and narrative table management, they have navigated systems from the early days of AD&D to the tactical depths of Pathfinder 2e and the narrative systems of Star Wars FFG. Their mission at RPG Player Hub is to help players and Game Masters master their craft through professional-grade guides and system-agnostic roleplay mastery.
4 responses